Discord
The Discord plugin assigns Cred to contributors participating in Discord chats; for example, by posting and reacting to posts.
The plugin does this using a special bot that scans a Discord server and captures all posts and emoji reactions. The data is temporarily cached, but the source of truth for the Discord plugin is always the live Discord server. That means that if content is deleted on Discord, it will also disappear from the Discord plugin (after a cache refresh).
For instructions on setting up the bot and configuring the plugin, see the Configuration section below.
Cred flow
Cred is minted on Discord reactions. It then flows to connected nodes.
The full set of node and edge types used by the Discord plugin are defined below.
Nodes
The Discord plugin creates the following types of nodes in the contribution graph:
- User:
A Discord user account, e.g. @decentralion. User accounts do not mint Cred, so setting a node weight would have no effect. Using the identity plugin, it's possible to merge user nodes with other identity nodes into a single, canonical identity. For example, if a contributor had a Discord user account and a GitHub account, then the identity plugin can merge those identities together.
Users are connected to posts they author, to posts they react to, and to posts that mention them.
- Post:
A Discord message, e.g. "Welcome to the SourceCred community!". A message node will be connected to its author (user node creating the message), emoji reactions to the message, and any users mentioned in the message with an "@".
- Reaction:
A Discord emoji reaction, e.g. 😂🌈💜🚀🤯. When a user reacts to a message, a reaction node is created that is connected to the author of the reaction (user that reacted) and the message reacted to.
Edges
The Discord plugin creates the following kinds of edges (connections between nodes) in the contribution graph:
- Authors:
An "authors" edge connects an author (user) to a message they created.
- Reacts to:
A "Reacts to" edge connects a reaction (emoji) to the message reacted to.
- Adds reaction:
An "Adds reaction" edge connects a reaction (emoji) to the author (user) of the reaction.
Configuration
In order for SourceCred to be able to access your Discord server's messages, reactions and other data, it uses a simple bot whose only function is reading messages and reactions in your server. Creating the bot and adding it to your server will require admin permissions. You will also need to be logged into the Discord web app with the same account with admin permissions.
Below are the basic steps to create your bot, point it at your Discord server and optionally set custom emoji reaction weights.
1. Enable Developer Mode
Under User Settings -> Appearance -> Advanced, turn on 'Developer Mode'. This will give you the ability to right click on items and copy their Discord IDs.
2. Configure server ID
Right click on your server and click 'Copy ID'. Open the Discord plugin
configuration file located at config/plugins/sourcecred/discord/config.json
and paste the server ID into the guildId field.
3. Create Discord Application
Bots require an associated Discord application. In your browser, navigate to the Discord Developer Portal. Click the 'New Application' button. Discord will prompt you to enter the name of your application and a description of it. The name and description can be anything you want. The application is simply to give the bot the ability to communicate with Discord APIs.
Once you have created your application, click on the 'General Information' tab.
You should see a APPLICATION ID under the application name. Copy this ID.
You'll need it later.
4. Create Bot
Click on the 'Bot' tab and click the 'Add bot' button. When prompted, confirm that you want to add the bot to the application. On the Bot tab, you should now see your bot. You should also see a 'TOKEN' field under the 'USERNAME' field. Copy this token for later.
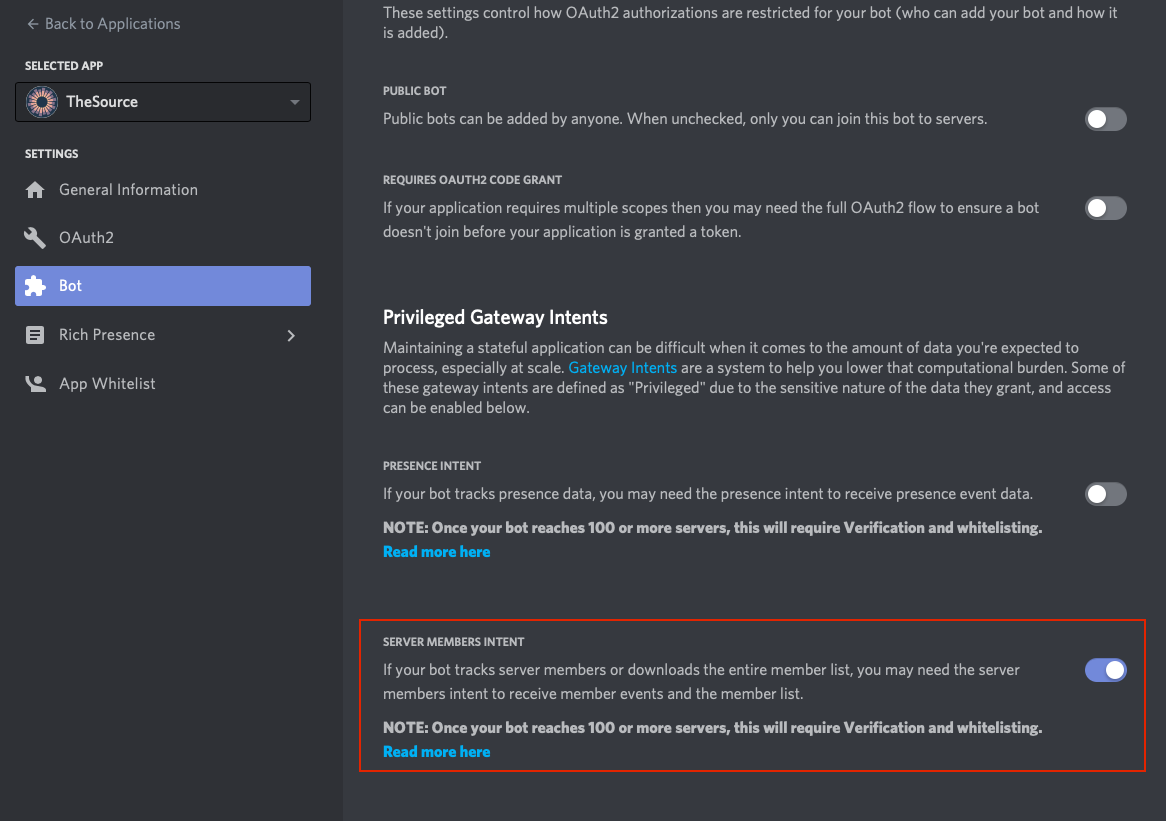
Scroll down to the "Privileged Gateway Intents" section and enable the "server members intent" setting. This allows the bot to get a list of the members in your discord server.
5. Invite Bot to Server
You can invite your bot to your server by constructing a URL with the following
format :
https://discordapp.com/api/oauth2/authorize?client_id=${APPLICATION_ID}&scope=bot&permissions=66560
Permissions options:
65536: Read Messages and Message History (minimum)66560: Read Channels, Messages and Message History [suggested]8: Admin
The APPLICATION_ID is the application ID you copied in Step 3. For example, if
your APPLICATION_ID were 1234, the URL would be:
https://discordapp.com/api/oauth2/authorize?client_id=1234&scope=bot&permissions=66560
Paste this URL into the browser you're logged into Discord with, with admin permissions. You will then be prompted to select your server and give the bot permissions to read messages and message history.
6. Set Environment Variable
You will need to create an environment variable named
$SOURCECRED_DISCORD_TOKEN and set it to the bot token created in Step 4.
Running Locally
If you’re running SourceCred locally, the environment variable can be set like any other. The one liner below will set the environment variable temporarily for the current terminal session:
$ export SOURCECRED_DISCORD_TOKEN=BOT_TOKEN
Running on GitHub
If you have configured SourceCred to run automatically on GitHub, you'll need to add the bot token to the GitHub Action that updates scores. Check out GitHub’s guide for how to add the token as a Secret that can be read by the Action.
Additional Configuration
The Discord Plugin has the richest configuration features of any of our plugins.
An example of a more complex config/plugins/sourcecred/discord/config.json
file might look like:
[
  {
    "guildId": "678348980639498428",
    "channelWeightConfig": {
      "defaultWeight": 1,
      "weights": {
        "455678923985223390": 2,
        "958390223495238354//general channel": 3
      }
    },
    "includeNsfwChannels": false,
    "propsChannels": ["980234890234890234", "455678923985232390"],
    "reactionWeightConfig": {
      "applyAveraging": false,
      "defaultWeight": 1,
      "weights": {
        "sourcecred:678399364418502669": 10,
        "👍": 2
      }
    },
    "roleWeightConfig": {
      "defaultWeight": 1,
      "weights": {
        "982349058213903445": 4
      }
    }
  },
  {
    "guildId": "225902581209348902",
    "channelWeightConfig": {
      "defaultWeight": 1,
      "weights": {}
    },
    "includeNsfwChannels": false,
    "propsChannels": [],
    "reactionWeightConfig": {
      "applyAveraging": false,
      "defaultWeight": 1,
      "weights": {}
    },
    "roleWeightConfig": {
      "defaultWeight": 1,
      "weights": {}
    }
  }
]
Wow! Let's break it down.
guildId
This is the server ID that you set in the above instructions. This is the
minimum configuration needed. You can include multiple servers by creating
multiple configurations within the highest level array. You can see this in the
above, as we have a config for "guildId": "678348980639498428", and for
"guildId": "225902581209348902",.
reactionWeightConfig
SourceCred can be configured to mint different amounts of Cred for different
emojis . This is done by setting custom reaction weights in the Discord plugin
configuration file: config/plugins/sourcecred/discord/config.json
If you want to change the weight for a default reaction, just put the reaction's
literal emoji in config.json. For example, if you wanted the 💜 emoji to have
a weight that is 5 times a regular reaction, add the line "💜": 5 to the
config, as shown below.
  "reactionWeightConfig": {
    "default": 0,
    "weights": {
      "👍": 1,
      "💜": 5,
      "sourcecred:678399364418502669": 10
    }
  }
If you want to set a custom weight for a custom emoji, you'll first need to get
the custom emoji ID. You can get this by right clicking on the custom emoji and
clicking 'Copy Link'. This will give you a URL to an image of the emoji. The
numeric substring in the URL is the emoji ID. For instance, below is the URL for
a custom SourceCred emoji called :sourcecred_pink:.
https://cdn.discordapp.com/emojis/745438325086879794.png?v=1
The emoji ID is 745438325086879794. The reaction weight is then specified in
config.json using the following format: $EMOJI_NAME:$EMOJI_ID. So if we want
to have :sourcecred_pink: be 20 times a regular reaction, we would add the
below line to config.json.
applyAveraging - false by default, meaning that the emoji scores on a
message are all added together, so more people reacting means more Cred. true
would mean that the emojis will be summed for each user, and then averaged
across users, so more people reacting does not mean more Cred.
"sourcecred_pink:745438325086879794": 20
channelWeightConfig
This can be used similarly to reactionWeightConfig to change the multipliers
for each channel. Reactions in a channel with a weight of 2 will be worth twice
as much as in a channel with a weight of 1.
Since IDs are not human-interpretable and can be hard to manage, we support
adding comments inside the channel ID key by using the delimiter //. You can
see this above as "958390223495238354//general channel": 3
Channel Categories are also supported. Simply add the category ID the same as you would add a channel ID. The category weight will be used if there is not a weight explicitly set for a channel within the category.
roleWeightConfig
This can be used similarly to reactionWeightConfig to change the multipliers
for reactions given by users with a given role. Reactions given by someone with
a role that has a weight of 2 will be worth twice as much as reactions given by
someone with a role that has a weight of 1. // comments are also supported
here. If a user has multiply weighted roles, the highest weight will be used.
propsChannels
There are 3 edge types that connect a message to a user: authors, mentions,
and props. By default, a message will use authors and mentions. If you add
channel IDs to propsChannels, messages in those channels will use authors for
the author and props for people mentioned. With a high edge weight set for
props edges, the people mentioned in messages in that channel will receive
much more cred than the authors. Additionally, props channels allow reactions by
the author of a message to be counted (they are usually ignored). This is a
great way to implement a #props or #praise channel, where people can post praise
for others.
includeNsfwChannels
In Discord, channels can be marked as NSFW (not safe for work) in the channel's settings. If you really want to include NSWF channels in the graph, you can set includeNsfwChannels to true. We discourage this, because message previews are included in the CredGraph, so you may be exposing explicit content publicly.
Need more help? Post in SourceCred's Tech Support Discord channel.